

How to Add a Calculator to WordPress Without a Plugin
You do not always need to install a separate plugin to add an online calculator to WordPress. In many cases, it is enough to create a calculator in Cowculator, copy the iframe code, and paste it into a Custom HTML block or HTML block in the WordPress editor.
This approach works for price calculators, service cost calculators, delivery calculators, preliminary estimates, package selectors, or any other calculation that needs to be added to a website quickly without extra load on WordPress.
Quick answer: how to embed a calculator in WordPress
The simplest option is to embed the calculator through an iframe. You create the calculator in Cowculator, open the publishing settings, copy the ready-made code, and add it to WordPress through the Custom HTML block.
- Create or open a ready calculator in Cowculator.
- Copy the embed / iframe code.
- Open the required page in WordPress.
- Add a Custom HTML block.
- Paste the iframe code.
- Check the page in preview mode.
- Publish or update the page.
<iframe
  src="https://calc.ink/YOUR-CALCULATOR"
  width="100%"
  height="720"
  style="border:0; width:100%;"
  loading="lazy">
</iframe>
In a real case, you should use the embed code generated by Cowculator for your specific calculator.
Why a WordPress calculator does not always need a plugin
WordPress has a large plugin ecosystem, and for many tasks, this is convenient. But not every interactive element needs to be implemented through a separate WordPress plugin. If the calculator already works as an external no-code tool, you can embed it on the page through an iframe.
For a website owner, this means less technical maintenance. You do not need to install, update, and configure a heavy calculator plugin. You do not need to check whether it conflicts with your theme, cache, page builder plugins, or other extensions. The calculator is created and edited in Cowculator, while WordPress simply displays it on the required page.
- Less load on WordPress. The calculator logic is not added directly to the CMS.
- Faster launch. You only need to copy the code and paste it into an HTML block.
- Easier editing. You can make changes in Cowculator without editing the WordPress page.
- Fewer plugin dependencies. The website does not get another module that needs to be maintained.
- Easier scaling. One calculator can be used on different pages or even on different websites.
The iframe approach works well for price calculators, service cost calculators, delivery calculators, preliminary estimates, tariff selectors, or lead generation calculators. If you do not need to directly modify the WooCommerce cart or run complex server-side logic inside WordPress, a separate plugin is often unnecessary.
What to prepare before embedding the calculator
Before adding a calculator to a WordPress website, it is worth preparing a few things. This helps avoid a situation where the code is already inserted, but the calculator does not look right, or the user does not understand what to do with it.
- A ready calculator in Cowculator. Check the fields, formula, result, and calculation logic.
- Published access. The calculator should have an active link or embed code.
- A page in WordPress. Decide exactly where it will appear: on a service page, landing page, pricing page, blog article, or separate SEO page.
- Access to the editor. You need a role that allows you to insert HTML. In self-hosted WordPress, this is usually an administrator.
- Explanatory text. Near the calculator, explain what it calculates, what data is needed, and what the user will receive after the calculation.
Do not embed a calculator without context. If a user sees a form but does not understand what result they will get, conversion will be lower. A short explanation before the calculator often works better than just the heading “Calculator”.
How to add a calculator to WordPress: step-by-step guide
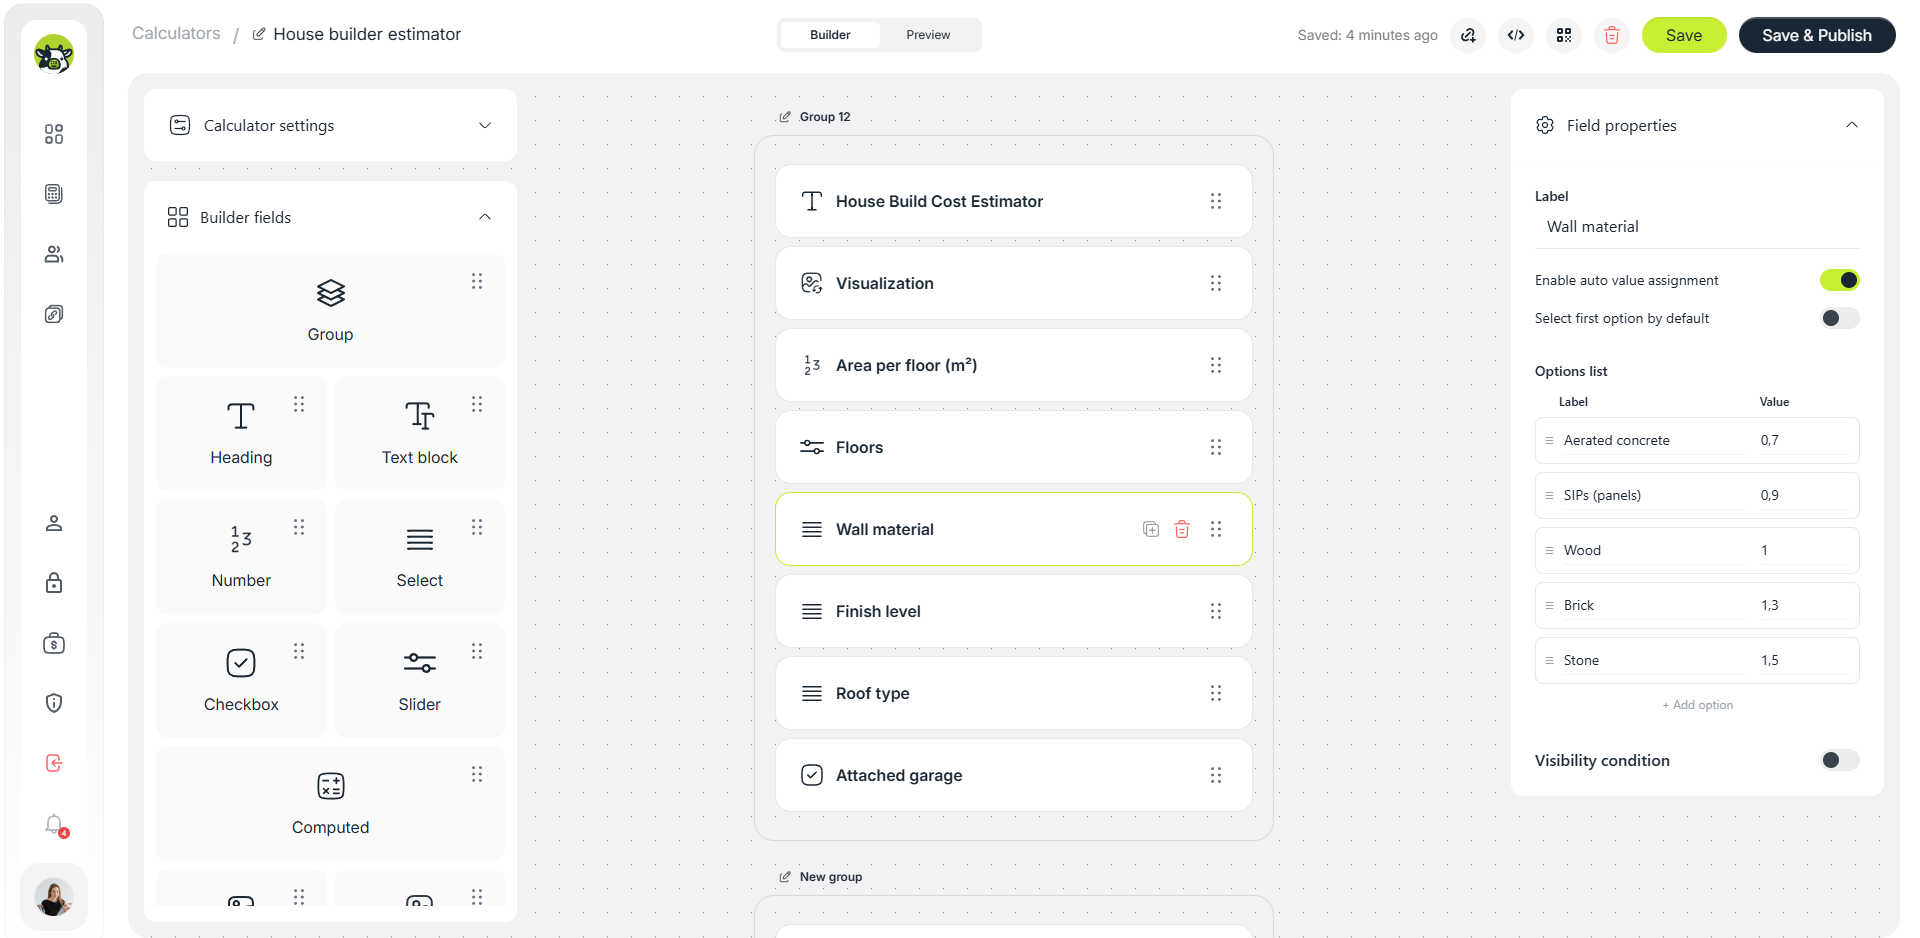
Step 1 — create a calculator in Cowculator
First, create the calculator itself. Add the fields you need: service type, quantity, scope, complexity, additional options, or any other parameters that affect the result. After that, set up the formula, test the calculation, and make sure the result is clear for the user.
If the calculator should collect leads, add a CTA and a short form. For example: “Get an exact quote”, “Send me an offer”, or “Discuss my project”.
Step 2 — copy the iframe code
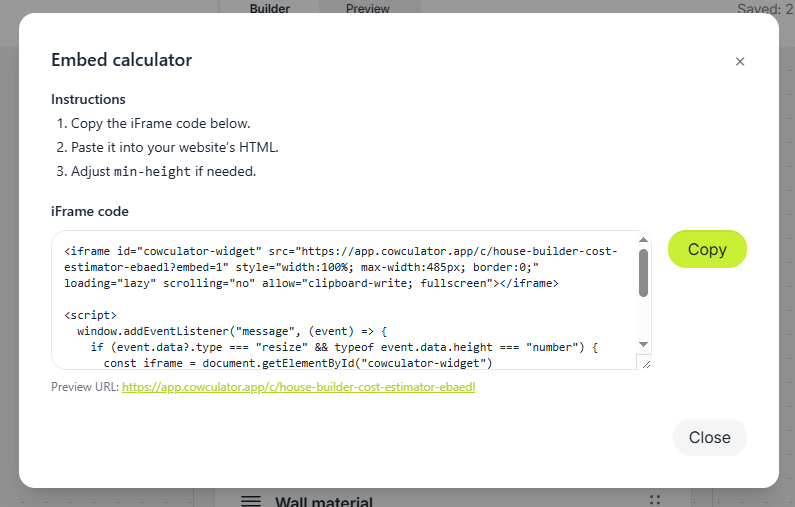
After the calculator is ready, open the publishing or embed settings and copy the embed code. Usually, this is an iframe code that contains the calculator link, width, height, and additional display parameters.

Do not edit the link inside the iframe unless necessary. If you need to change the calculator, it is better to do it in Cowculator rather than manually editing the generated code.
Step 3 — open the required page in WordPress
In the WordPress Dashboard, go to the page or post where the calculator should appear. This can be a specific service page, an advertising landing page, a Pricing page, or a separate blog article.

It is better to place the calculator where the user already understands the context but has not yet reached the point where they may lose interest. Placement after a short explanation of the service and before the detailed SEO text often works well.
Step 4 — add a Custom HTML block
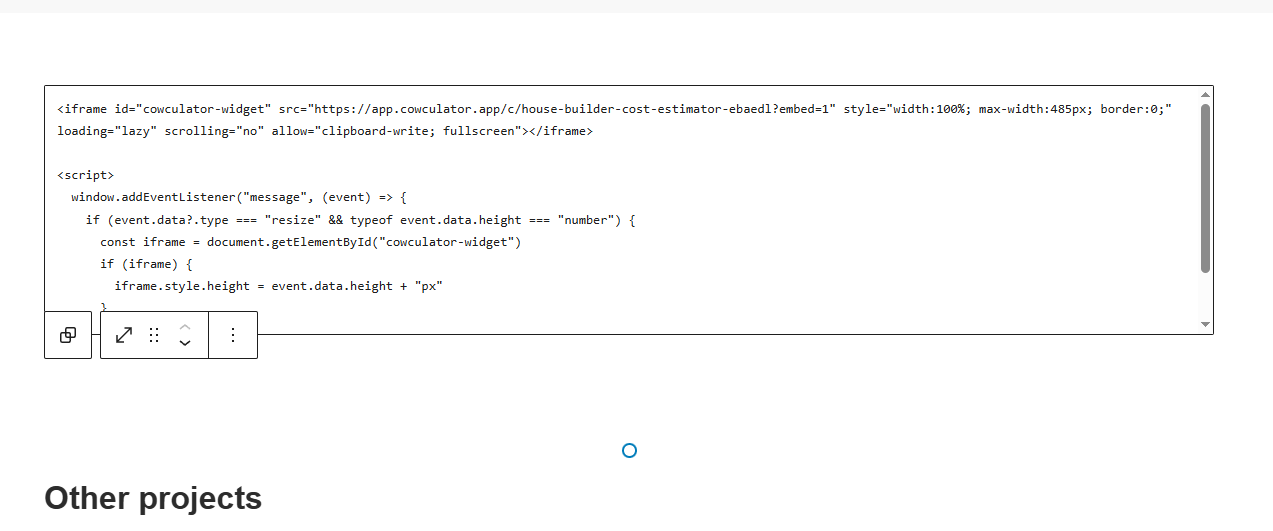
In the WordPress editor, click +, find the Custom HTML block, or type /html on a new line. Then paste the iframe code into this block.


Do not paste the iframe into a regular text block if the editor automatically changes HTML. For this type of code, it is better to use the HTML block.
Step 5 — check the page before publishing
Before updating the page, open Preview. Check whether the calculator loads, whether it is cut off by height, whether there is horizontal scrolling, and whether the fields, buttons, and lead form work correctly.
Make sure to check the mobile version. Some users will open the page from a smartphone, so the calculator should be convenient not only on desktop.

Step 6 — publish or update the page
If everything looks correct, click Publish or Update. After publishing, open the page in a separate tab as a regular user and go through the calculation from start to finish one more time.

It is also a good idea to check the page in another browser or in incognito mode, especially if caching is enabled on the website.
Where to place the calculator on a WordPress website
Technically, you can embed the calculator on almost any page. But placement affects whether users will actually use it. If the calculator is placed in the right context, it does not simply decorate the page — it helps the visitor make a decision.
Service page
This is one of the best options for a service cost calculator. The user reads the service description, sees the benefits, and can immediately calculate a preliminary price.
Landing page
For ad traffic, a calculator can replace a long form. The visitor does not just leave contact details — they first receive a personalized estimate.
Pricing page
If you have packages or tariffs, the calculator helps the user choose the right option for their situation and better understand the difference between packages.
Separate SEO page
This is a good option for queries such as “renovation cost calculator”, “website price calculator”, “delivery calculator”, or “service cost calculator”.
In most cases, you should not hide the calculator at the very bottom of the page. It is better to show it after a short explanation: what can be calculated, which parameters are needed, and what the user will receive after the calculation.
WordPress.org and WordPress.com: an important difference
When people say “a WordPress website”, they may mean different things. There is self-hosted WordPress — a website installed on your own hosting. It is often associated with WordPress.org. There is also WordPress.com — a hosted platform with its own plans, rules, and limitations.
In self-hosted WordPress, an administrator can usually insert an iframe into a Custom HTML block. But if the user does not have the required permissions, or the website has additional security restrictions, WordPress may sanitize part of the HTML code.
In WordPress.com, the ability to insert iframe and other HTML tags may depend on the plan and enabled hosting features. So if the iframe code disappears after saving the page, the reason may not be the calculator, but platform limitations, the user role, or security settings.
Check whether this is WordPress.org or WordPress.com, what role you have in WordPress, whether your plan allows iframe embeds, and whether there are security plugins or filters on the website that sanitize HTML.
How to configure iframe so the calculator looks right
Embedding the iframe is only half of the task. It is important that the calculator looks clean on the page, is not cut off, does not create horizontal scrolling, and works properly on mobile devices.
Width
For most pages, it is best to use width="100%". This allows the calculator to take the available container width and adapt better to different screens. A fixed width in pixels can create problems on mobile devices.
Height
The height should be selected for the specific calculator. If the calculator is short, 500–700 px may be enough. If there are many fields or the result takes more space, it is better to increase the height. If the iframe is too low, the calculator may be cut off or create internal scrolling.
Border
To make the calculator look like part of the page, you can remove the default frame with style="border:0;". This makes the integration visually cleaner.
Lazy loading
If the calculator is not placed on the first screen, you can use loading="lazy". Then the iframe will not load immediately until the user approaches this block.
<div style="width:100%; max-width:960px; margin:0 auto;">
  <iframe
    src="https://calc.ink/YOUR-CALCULATOR"
    width="100%"
    height="720"
    style="border:0; width:100%;"
    loading="lazy">
  </iframe>
</div>
The height value should be adjusted for your specific calculator. For longer forms, it is better to increase the height.
Plugin or iframe: which is better for a calculator?
It would be wrong to say that WordPress plugins are always bad. For some tasks, they are genuinely needed. But for an online calculator, iframe is often a simpler, faster, and safer option to maintain, especially if the calculator is created in a separate no-code service.
Iframe is better if
- you need to quickly add a calculator to the website;
- you do not want to install another WordPress plugin;
- the calculator should work on several websites;
- you want to edit the logic without changes in WordPress;
- the calculator collects leads or provides a preliminary estimate;
- it is important to reduce the number of technical dependencies in the CMS.
A plugin or custom development may be needed if
- the calculator must directly modify the WooCommerce cart;
- a complex payment integration is required;
- data must be stored specifically inside WordPress;
- deep synchronization with website users is needed;
- there is specific server-side logic;
- the calculator is part of a complex user dashboard.
For most marketing tasks — a price calculator, service cost calculator, delivery calculator, preliminary estimate, package selector, or lead qualification — the iframe approach is usually enough.
How to collect leads through a calculator on WordPress
A calculator should not be just an interactive block on a page. Its main business value is to help the user make a decision and send you a more qualified request.
When a person completes a calculation, they are already interacting with your offer. They choose parameters, see an estimated price, and understand the difference between options. This is exactly the right moment to offer the next step.
- Add a specific CTA. For example: “Get an exact quote”, “Send me an offer”, “Discuss my project”, “Save the calculation and get a consultation”.
- Do not ask for too much. Name, email, or phone is often enough for the first contact.
- Explain what happens next. Write that a manager will contact the user, clarify the details, or send a personalized offer.
- Keep the calculation context. If the lead comes with the calculator parameters, it is easier for the manager to continue the conversation.
It is better to avoid a generic “Submit” button. It does not explain the value of the action. Instead, the CTA should match what the user wants to receive: an estimate, an offer, a consultation, a package recommendation, or a refined price.
Can a calculator help an SEO page?
A calculator can make a page more useful for users, but the iframe itself does not replace text content. If you want the page to rank in Google, you need to add meaningful explanation around the calculator.
For example, if this is a “Renovation cost calculator” page, it is worth explaining which parameters affect the price: area, type of renovation, materials, demolition, electrical work, plumbing, and timeline. If this is a “Website price calculator”, you can describe website types, number of pages, design, integrations, SEO setup, support, and additional options.
A good SEO page structure with a calculator can look like this:
- A short introduction: what can be calculated.
- The calculator in the upper part of the page.
- An explanation of the calculation parameters.
- A description of what is included in the price.
- A block with common questions.
- A CTA for getting an exact quote.
Practical approach: do not hide the calculator too low. Give a short explanation, show the tool, and place the detailed SEO text and FAQ below.
What to do if the calculator does not appear
Sometimes, after inserting the iframe, the calculator does not appear, gets cut off, or WordPress removes the code. Most often, the problem is not the calculator itself, but WordPress restrictions, the user role, the plan, the theme, or security settings.
- The iframe disappears after saving. Check the user role, WordPress type, and whether your plan allows iframe embeds.
- The calculator is cut off. Increase the
heightparameter in the iframe code. - Horizontal scrolling appears. Check whether
width="100%"is used and whether there is no fixed width in the container. - The calculator does not look good on mobile. Check the mobile version of the page, the container width, and extra spacing from the theme.
- The block shows an error. Make sure the iframe code was copied completely, and that the quotes or URL were not changed by the editor.
- Nothing changed after updating the page. Clear the website cache, optimization plugin cache, or CDN cache if used.
If the calculator opens through a direct link but does not appear in WordPress, the issue is almost certainly in the embed settings, permissions, theme, or website restrictions.
Recommendations for better conversion
The mere presence of a calculator does not guarantee leads. It is important that the user quickly understands its value, completes the calculation without extra effort, and sees a logical next step.
- Do not make the calculator too long. For the first version, 5–8 main fields are often enough.
- Use human-friendly field names. Instead of technical terms, use wording that customers understand.
- Explain complex options. If a parameter may be unclear, add a short hint.
- Show the result honestly. If the price is preliminary, say so: “estimated cost” or “preliminary calculation”.
- Give a clear CTA. After the calculation, the user should understand what to do next.
- Check the mobile version. The calculator should be convenient on a smartphone, not only on desktop.
Create a WordPress calculator without a plugin in Cowculator
In Cowculator, you can create an online calculator without code, configure fields, formula, result, and lead form, and then embed it in WordPress through iframe or a Custom HTML block.
This is a convenient option if you need a price calculator, service cost calculator, delivery calculator, preliminary estimate, or package selector without installing heavy WordPress plugins.
Create a calculatorFAQ
Can I add a calculator to WordPress without a plugin?
Yes. If the calculator is created in an external service, it can be embedded in WordPress through iframe inside a Custom HTML block or an HTML block in the editor.
Does iframe work in WordPress?
In self-hosted WordPress, iframe can often be inserted through a Custom HTML block if the user has the required permissions. In WordPress.com, iframe support depends on the plan and enabled hosting features.
Why does WordPress remove iframe code?
The reason may be the user role, security restrictions, WordPress.com plan limitations, or HTML filtering. Check permissions, WordPress type, and security settings.
What is better: a WordPress calculator plugin or iframe?
For a simple online price calculator or service cost calculator, iframe is often faster and lighter. A plugin or custom development may be needed for deep integration with WooCommerce, payments, or internal website data.
Where is the best place to put a calculator on a WordPress website?
The best places are a service page, landing page, pricing page, or a separate SEO page for a specific query, such as “renovation cost calculator” or “website price calculator”.
Can this calculator be used to collect leads?
Yes. After the calculation, you can add a CTA and a short form so the user can leave contact details and receive an exact offer or consultation.